Multiband compressor/limiter window - Help - Stereo Tool 6.00
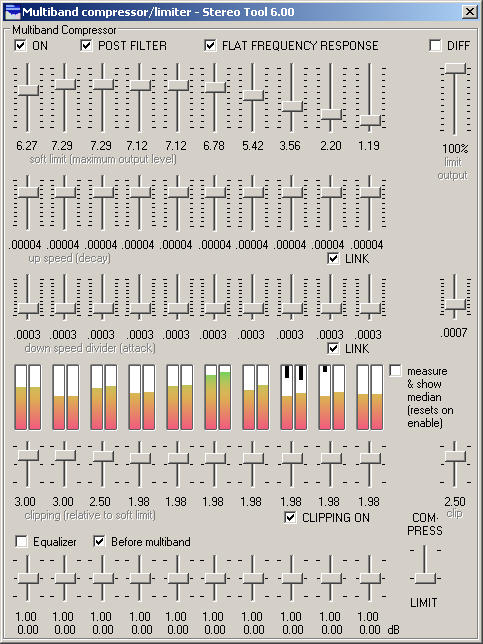
Multiband compressor/limiter window
Volume compression (A.K.A. audio level compression) reduces the dynamic range of a sound. This means that loud sounds become softer, and soft sounds become louder.
Multiband volume compression means that the audio is separated into seperate frequency bands, and each frequency band is compressed separately. This means that for example bass and hi-hats are treated separately, and a loud peak of one of the two does not affect the other. This greatly reduces pumping, and it makes different recordings sound more equal. (If one recording has a loud bass and the next has a loud hi-hat, after using the multiband compressor the loudness of the bass and the hi-hat is lowered.) See Wikipedi: Audio level compression for a lengthy description.
The Multiband compressor in Stereo Tool splits the audio into 10 frequency bands, ranging from extremely low bass sounds (40 Hz) upto very high highs (16 kHz). Then it compresses or limits each of those bands separately.
Limiting means that audio below a certain volume is left untouched. If the volume gets above this level (A in the graph below), the output volume is lowered such that the resulting output stays at the set maximum volume A. Regardless how much the input level is increased, the output level stays the same.
Compression affects all audio: Low volume sounds are amplified, high volume sounds are de-amplified. If the input volume is increased further, it has less and less effect on the audio - but a bit of the increase is always maintained.
In general, when the goal is to make the volume as constant as possible, use limiting. If the goal is sound quality, maintaining the dynamics of the recording, use compression.
For each band, when the output volume is lowered due to too loud sounds, this slider determines how fast the output volume can be increased again. A higher value means that the amplification can increase faster. Too high values can cause a cracking sound.
LINK ((below 'up speed (decay)' sliders)) If enabled, when one up speed slider setting is changed, they all move to the same location.
down speed divider (attack) Determines how fast the volume for this frequency band is lowered when the output level gets above soft limit (maximum output level).
For each band, when a sound that is louder than the set maximum occurs, this value determines how fast the output volume is lowered. Too high values make the sound very flat, too low values may cause the amplification to be lowered too slowly, causing (probably unwanted) loud sounds when an instrument starts playing suddenly.
LINK ((below 'down speed divider (attack)' sliders)) If enabled, when one down speed slider setting is changed, they all move to the same location.
COMPRESS / LIMIT Determines whether the audio is compressed or limited.
Limiting means that audio below a certain volume is left untouched. If the volume gets above this level, the output volume is lowered such that the resulting output stays at the set maximum volume (soft limit (maximum output level)).
Compression affects all audio: Low volume sounds are amplified, high volume sounds are de-amplified.
In general, when the goal is to make the volume as constant as possible, use limiting. If the goal is sound quality, maintaining dynamics, use compression.
CLIPPING ON Enabled or disables the multiband clipper.
When the volume of a band gets higher than the value set in soft limit (maximum output level), clipping can be used to cut off the sound that is too loud.
Using clipping improves the sound quality because very short very loud spikes that are left over after compressing or limiting are removed. This makes the sound far less "jumpy", and the output volume more constant.
clipping (relative to soft limit) Sets the clipping level for a frequency band.
When the volume of a band gets higher than the value set in soft limit (maximum output level), clipping can be used to cut off the sound that is too loud. The value of each clipping slider determines at which volume clipping starts, for example when the clipping slider is set to 1.50, clipping starts when the volume gets above 1.50 times the soft limit (maximum output level) value.
Using clipping improves the sound quality because very short very loud spikes that are left over after compressing or limiting are removed. This makes the sound far less "jumpy", and the output volume more constant. Clipping too much (at too low levels) however makes the sound dull and lifeless.
Equalizer Enables or disables the 10-bands equalizer.
Before multiband Switches between equalizing before performing multiband compression (hence boosting or reducing the compression of bands), or afterwards (behaving like a normal equalizer).
This setting is only available for convenience. Disabling it gives the same result as enabling it and multiplying the soft limit (maximum output level) levels by the equalizer levels.
(below Equalizer checkbox) Sets the equalizer level for a frequency band.
The output volume of each band is multiplied by this value. This can be done before or after Multiband compression (see Before multiband).
POST FILTER Enables high quality mode.
This filters out compression artifacts. Doing so increases the CPU load, and it's only useful when very aggressive compression or limiting is used (high up speed (decay) or down speed divider (attack) levels) - otherwise there are no compression artifacts to filter.
FLAT FREQUENCY RESPONSE Tone comes out at roughtly the same level regardless of whether they are at the center or between frequency bands.
Without this mode, if a single tone is in between two bands it will come out about twice as loud as when it's in the center of a band. This is most noticeable when playing a tone sweep, but normal music can also be affected by this. Especially bass frequencies can often not be controlled accurately without Flat frequency response mode.
Flat frequency response mode enables POST FILTER. If that filter was not already enabled, the CPU load is increased.
limit output Limits the maximum multiband output level.
Advice: Don't use this (leave it at 100%). Error: Panel 'Final limiter' not found and Error: Panel 'Loudness (volume)' not found do a much better job at this.
down speed divider (attack) (separate rightmost slider) Lower the volume of ALL band when the output gets louder than limit output.
See limit output. This filter attempts to reduce only the bands that contribute most to the fact that the sound is too loud.
clip (separate rightmost slider) Clip ALL band when the output gets louder than this level * limit output.
See limit output. This filter only clips those bands that contribute to the fact that the sound is too loud.
measure & show median (resets on enable) Determine the median (~ average) effect of the multiband compressor on each band.
This can be used to determine the effect that the multiband compressor has on the audio, eg. if it reduces or boosts certain frequencies compared to others.
In short: If you have a (preferably large) number of tracks that sound good, turn this on, play them all, then check if the median value for all the bands is roughly the same. If not, tweak the settings, turn this off and on again, and play those tracks again.
Enabling this displays the median value of each of the multiband bands since it was enabled. Turning it off and on again clears its data, so if you change a setting, turn it off and on to start a new measurement.
If you want to make sure that - on average - your multiband settings have no effect on the frequency content, play lots of songs with this (continuously) enabled, then check that the medians for all bands are at (nearly) the same level.
The AGC may already have had an impact on the frequency content if you've set it to 2 or 3 bands. For best results, I set the AGC to single band during this measurement. Then the Multiband has been configured to have no impact on the audio as long as both AGC bands output the same level, but if the bands differ, Multiband will bring them closer together again.
Note: This setting is not and will never be saved to disk. You have to enable it when you need it.