Automatic Gain Control (AGC) window - Help - Stereo Tool 6.00
Automatic Gain Control (AGC) window
The AGC filter attempts to make the audio level constant, without causing noticeable changes in the sound.
If does so by - if possible very gradually - increasing and decreasing the audio level. If sudden spikes are present, it can remove those spikes without lowering the output level too much, to avoid pumping and similar annoying effects.
The AGC never increases the incoming audio level, it only decreases it if it gets too loud. Use Error: Slider 'MAIN_PREAMP' not found to increase the input level.
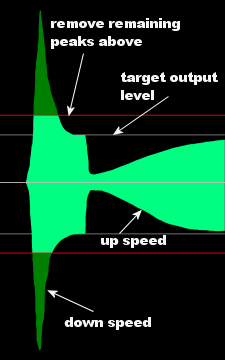
Before AGC
AGC output
Piece of audio before and after AGC. The output signal (bright green) is much more constant in volume than the input signal.
The AGC can be used stand alone (with no other filters), but it can also be used to feed the Multiband Compressor with a more or less constant signal. Because the Multiband Compressor is usually set to respond very quickly to volume changes, input with a very loud volume which is reduced strongly causes a very flat, over-compressed sound. This can be reduced by reducing the speed with which the multiband compressor responds, but that also reduces the effectiveness of the multiband compressor. If your input audio level is already fairly constant, there's no need to use the AGC, just set the Error: Slider 'MAIN_PREAMP' not found slider to the correct value.
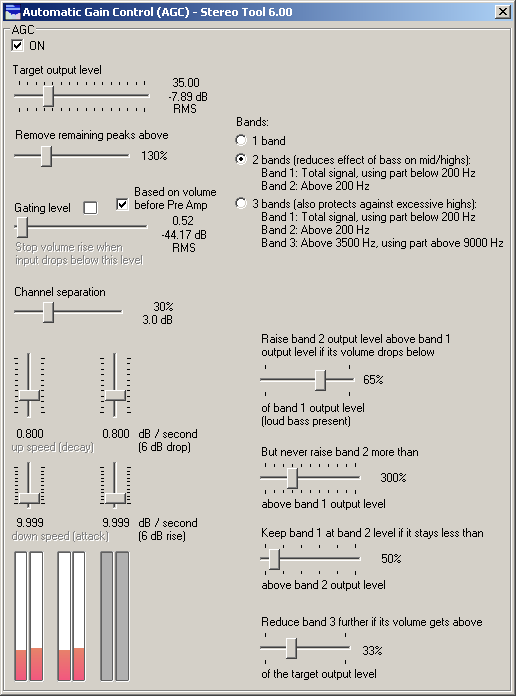
Target output level Determines the target maximum output level.
This slider determines the target RMS output level. If the input level gets above this level, the AGC will reduce the output volume.
Remove remaining peaks above Removes short volume spikes that remain at the end of the AGC processing.
The AGC responds slowly to volume changes, to keep the effects on the audio as small as possible. This does mean that if the volume suddenly increases a lot, a loud 'spike' of sound can remain. This slider determines how much 'spike' is allowed above the configured Target output level; anything louder than that is reduced.
If this slider is set too high, loud spikes remain; if it is set too low, too much spikes are removed, which takes out 'kicks' from the audio, making it sound too 'flat'.
If this setting causes peaks to be removed, black bars are displayed in the output bars at the bottom of the window. Ideally, these should only occur when they are needed (sudden volume jumps), not during 'normal' music (like every bass kick).
Gating level Stops the volume from rising when there is (near) silence.
If the input level is very low (noise, silence), raising the output level might cause annoying effects (increasing noise levels during silence, followed by a sudden drop when the sound starts again). This slider determines that if the input level is below the configured Gating level, the gain rise is reduced or stopped (up speed (decay) is dynamically reduced).
Based on volume before Pre Amp Determines whether Gating is based on the actual input level, or the input level after Error: Slider 'MAIN_PREAMP' not found.
If this is enabled, the gating level is based on the input level, ignoring the setting of Error: Slider 'MAIN_PREAMP' not found. In other words, increasing Error: Slider 'MAIN_PREAMP' not found does not require changing the gating level.
If this is disabled, gating just responds to the actual input volume of the AGC - if Error: Slider 'MAIN_PREAMP' not found is increased, chances are that Gating level also needs to be increased to get the same behavior as before.
Channel separation Determines how independent the two channel volumes can move.
If both AGC channels behave completely independent of each other, a loud tone on one channel may cause strange stereo effects because other tones are reduced on one channel, but not on the other. On top of that, the total audio content changes if this happens.
If both AGC channels do exactly the same, a loud tone on one channel causes volume drops on the other channel, which can also be unwanted.
This slider allows choosing an intermediate setting.
up speed (decay) Determines how fast the volume level is increased when the output level is below the Target output level.
When the output volume has been lowered due to too loud sounds, this slider determines how fast the output volume can be increased again. A higher value means that the average output level gets closer to the target level, but may also cause pumping. A low value may cause source material with big volume changes to come out too soft on average - and the quieter parts will stay very quiet.
down speed (attack) Determines how fast the volume level is decreased when the output level is below the Target output level.
When the output volume would be louder than the set maximum Target output level, this slider determines how fast the output volume is reduced. A higher value means that the average output level gets closer to the target level, but may also cause sudden volume drops when very short loud spikes occur. A low value may cause spikes to remain when the sound suddenly increases a lot. See Remove remaining peaks above for a solution for that.
Bands Select 1, 2 or 3 bands AGC.
1 band gives the best approach of the total RMS volume. However, loud bass sounds will cause other frequencies to be dropped (which makes sense, as they count as part of the RMS volume).
2 bands sounds more constant. Band 1 contains all the sound (hence behaves identical to the 1 band AGC), band 2 contains frequencies above 200 Hz. There are 2 issues when using 2 bands:
The volume of the two bands may move apart, causing the audio to sound different.
In the 2nd band, because very low frequencies are ignored, loud higher frequencies such as loud voices in music may cause the volume of band 2 to drop.
3 bands is identical to 2 bands (see the previous paragraph), except that very loud highs are reduced. This time, also the level of the 3rd band is never increased above that of band 2. Reduce band 3 further if its volume gets above ... of the target output level is used to set the target maximum highs level.
Raise band 2 output level above band 1 output level if its volume drops below Configure band 2 protection against volume drops due to loud mid or high frequencies.
See Bands. This slider is used to tell the AGC how loud band 2 is expected to be compared to band 1. Band 2 is processed with a lower Target RMS level, based on this setting. Normally this should lead to roughly identical dynamic amplification levels for band 1 and 2. If - due to loud mid or high frequencies - band 2 is much louder than the configured level, its output volume is not dropped below the output volume of band 1. This means that, in cases where relatively loud mid or high frequencies are present, the 2 band AGC starts behaving more like a 1 band AGC, which gives better protection against unwanted volume drops and rises.
But never raise band 2 more than ... above band 1 output level Configure band 2 protection against very loud highs relative to the lows.
See Bands. If there are only bass sounds present, the band 2 output level could rise indefinitely, while band 1 would be kept very low. This greatly increases noise levels. (For example, if the bass in the input is reduced by a factor 40, and the highs are not reduced at all, in total the highs are 40 times louder than the lows). This slider configures how much the band 2 output level can rise above the band 1 output level.
Keep band 1 at band 2 level if it stays less than ... above band 2 output level Configures how much extra bass is needed to drop band 1 output level below band 2 output level.
See Bands. If the bass is just a bit too loud (the band 1 output level would drop slightly below the band 2 output level), keeping the band 1 output level equal to the band 2 output level gives much better results, because it better preserves the original audio content. But if the bass gets very loud, it does need to be dropped. This slider configures how much louder band 1 may get before its output level is reduced.
Reduce band 3 further if its volume gets above ... of the target output level Configure the maximum high frequency RMS level.
See Bands. If 3 bands are used, this slider configures the maximum high frequency RMS level, relative to the Target output level. Note that band 3 will never be louder than band 2, so setting this to 100% makes the 3 band AGC equal to the 2 band AGC. Setting it to 0% completely removes the highs.