Limiting and Loudness window - Help - Stereo Tool 6.32
Limiting and Loudness window
This window contains filters to control the output loudness.
BS412 Limiter panel
In several European countries, FM stations have to comply to a standard called ITU-R BS.412. This standard demands that the total power over any 60 second period is below a certain threshold.
The BS412 limiter in Stereo Tool attempts to achieve this without compromising the audio quality. It does this using 20 different algorithms that predict future input based on previous input, which together decide what to do with the sound to keep it below, but as close as possible to, the threshold.
Despite of this, you get the best result if the input level is already nearly constant. The BS412 limiter in Stereo Tool knows how to handle increased highs due to pre-emphasis and slightly increased bass because other filters respond less to bass (due to ITU-1770). But other changes may cause problems. So try to avoid using the equalizer in the Multiband compressor and Bass Boost too much.
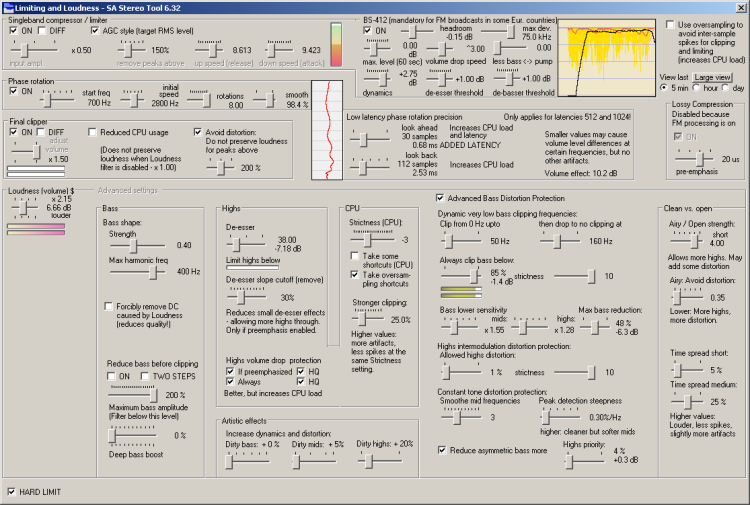
The BS412 graph shows output and filter effect levels in a single graph. The pre-drawn horizontal lines are 1 dB apart, the darker line on top is at 0 dB.
In the graph, you can see lines of different colors: BLACK shows the moving BS412 output level and should be below, but as close as possible to, the 0 dB line. RED shows slow volume changes. In general, it's best if this line doesn't drop below -1 dB - bigger drops can be noticeable. GREEN/PINK shows short-term volume drops caused by the compressor. YELLOW spikes show that the de-esser reduced loud highs. The actual drop of the highs is less than what is depicted here. BROWN spikes show the de-basser in action.
You can see the output for the last 5 minutes, the last hour or the last day. Use the "Large view" button for a bigger display, which also shows the maximum FM deviation at the bottom (top line is +/- 75 kHz, each horizontal line is 10 kHz less).
max level (60 sec) Determines the maximum BS412 output level.
In most countries where BS412 is mandatory, this must be set to 0 dB, but in some it's +3 dB. When changing this setting, you may also need to adjust max amplification.
headroom Determines the BS412 level headroom (error margin).
Determines how much lower than the level selected in the algorithm should aim. If this level is very close to 0, any unexpected peak in the input signal may cause the level to get above and a very sudden and potentially big volume drop will occur to compensate for it (there are protections built into the algorithm to immediately compensate for these drops, but it's better not to have them in the first place). If you set a higher value, you loose loudness. So this value needs to be tweaked for each preset. In general, if you look at the black line in the graph over a longer period of time, and it often gets close (say, one pixel away) to the 0 dB line, or if you see sudden drops in the red line, you should probably increase this value a bit. In general, you need higher values if is set higher. For most cases, 0.15 dB seems to suffice (and it costs only 0.15 dB of loudness). Very occasional red line drops (a few times a day) can be acceptable, because in most cases the effect is masked by the algorithm.
dynamics Controls the BS412 compressor target level, relative to max level (60 sec).
Setting this higher means that the compressor kicks in later, but may result in bigger slow volume changes.
de-esser threshold Limits loud highs before the compressor.
Reduces loud (pre-emhpasized) highs before they hit the compressor. This filter only responds if the total level would be too high.
de-basser threshold Limits loud bass before the compressor.
Reduces loud bass sounds before they hit the compressor. This filter only responds if the total level would be too high. controls if in case of loud bass the total level is reduced (causing pumping) or only the bass (causing less bass).
less bass <-> pump Chooses between bass reduction or pumping.
If the bass gets above the threshold set in , this slider controls if the entire volume should be dropped (causing pumping) or only the bass (resulting in less bass).
volume drop speed Determines how fast the volume is dropped if it is too high
BS412 requires that the total volume stays below a threshold in any 60-second period. If the input level is too high (higher than ) at any moment, it needs to be dropped. If this is done fast, the drop will be less deep, but for short bursts it will be bigger than needed. If the drop is slow, and the loud sounds last for a longer period of time, the drop will get deeper because the first part which is too loud needs to be compensated. So, if you broadcast audio with rapidly changing volume levels, a lower value (say, 2) might work better, for normal music a value around 3 should be fine. If you're going to broadcast constant tones, go for a higher value :) .
max dev. Determines the BS412 FM signal maximum deviation.
This slider can be used to create a more dense sound by clipping the output at a lower level. It can also be used as protection against small sound card or transmitter errors which may cause spikes that were not available in the signal that Stereo Tool sends out (for example, a condensor in the signal path removes DC offset, which can cause larger spikes in the opposite direction).
max amplification Amplifies or attenuates the input level before the BS412 limiter
This value should be chosen to amplify or attenuate the audio level such that it is just above the BS412 target level, to avoid stress on the BS412 limiter. Red line drops should be limited as much as possible (preferably no drops below -1 dB) and the green/pink line drops should not get below -2 dB too often, but the black line should be as close as possible to 0 dB.
remove peaks above Cuts off remaining peaks above this level
The compressor responds slowly, this allows cutting off peaks that remain.
up speed (release) Determines how fast the volume level is increased when the output level is low.
When the output volume has been lowered due to too loud sounds, this slider determines how fast the output volume can be increased again. A higher value means that the average output level gets closer to the target level, but may also cause pumping. A low value may cause source material with big volume changes to come out too soft on average.
down speed (attack) Determines how fast the volume level is decreased when the output level is too high.
When the output volume would be louder than the set maximum + , this slider determines how fast the output volume is reduced. A higher value means that drops faster. A low value may cause the volume to be too loud for a longer period of time.
Phase rotation panel
Phase Rotation is intended to protect the clipper (Loudness or Final Clipper) against certain types of sounds that can easily distort. Examples are voices (especially female voices) and trumpets. They are very asymmetrical, with big spikes in one direction, and if there's also a bass sound present they tend to suffer from intermodulation distortion.
This filter changes the sound in a way that is nearly inaudible, but protects the clipper, resulting in louder and cleaner output for these types of sounds.
Final clipper panel
Clips the audio below 0 dB. This filter is good at removing short spikes, but causes distortion if it needs to clip too much.
If Loudness is enabled, this filter is in bypass mode, except that it amplifies the audio with the value set in the slider, and works (which is probably bad in this case!).
adjust volume Amplifies the input level.
Amplifies the input level by this amount.
Do not preserve loudness for peaks above Distortion protection.
Quickly lowers the volume if the input level exceeds this level. Use with care, may cause distortion by itself if the cause of the high input level is loud bass.
Loudness (volume) $ panel
Boosts the output level without increasing peak level. The Loudness filter can make the sound up to 12 dB louder, without causing higher peaks (hence clipping) in the output.
The clipper in Stereo Tool, which is activated when Loudness is enabled, detects and actively removes (almost) any distortion that is audible by humans - but nothing else! This results in a clean, open, dynamic and very bright sound.
This filter is intended for FM, AM or internet radio stations that want to sound loud. It can also be used to create a 'denser' sound.
Loudness leaves some small spikes in the signal. Therefore, if you use this filter, and the Post Amp slider is set at (or just below) 1, make sure that HARD LIMIT is enabled to avoid distortion caused by clipping. If you use Stereo Tool to prepare an FM signal, always turn HARD LIMIT on when using the Loudness filter, regardless of the Post Amp slider setting.
Enable Loudness filter and set amplification Amplifies the input level and turns the clipper on.
This slider sets the the input level amplification and turns the clippers on.
Bass shape: Strength Controls how much deep bass sounds are made louder.
Controls the amount of deformation in low bass sounds to make them sound louder if they are being clipped. The deformation makes the bass sound louder without allowing higher peak levels which would cause intermodulation distortion in higher frequencies. See also .
Bass shape: Max harmonic freq Controls upto which frequency the bass may be deformed to sound louder.
Bass sounds upto this frequency can be deformed to make them sound louder without getting higher peak levels. Setting this value higher gives more bass, at the cost of the sound quality of the bass. Values upto about 160 Hz should be fine.
Forbibly remove DC caused by Loudness (reduces quality!) Don't allow Loudness to add a DC offset.
In some cases, clipping only occurs in one direction (for example because there are spikes in one direction, but not in the opposite). Normally, Loudness will move the DC offset level to reduce the needed amount of clipping. This may however cause a DC offset in the output for a longer period of time, which is not always accurately reproduced by a sound card. So if you are feeding an FM transmitter with your sound card, and it's not phase linear, it's usually a good idea to enable this setting to avoid getting too big spikes in your FM modulation.
De-esser (Limit highs below) Reduce too loud highs
When pre-emphasis is used, highs are sent to the clipper at a very high level, potentially causing problems (drop of other frequencies and distortion). The de-esser reduces highs above this threshold, if the total audio level is too high. See also
De-esser slope cutoff (remove) (Reduces small de-esser effects - allowing more highs through. Only if preemphasis enabled.) Ignore de-esser for small drops.
If the highs level is only slightly too high see (), this slider reduces the effect of the de-esser, leaving a brighter sound. If the highs get really loud, the de-essing behavior is not changed.
Highs volume drop protection Protect against volume drops caused by loud highs.
Protects the sound against volume drops caused by extremely loud (often pre-emphasized) highs. The only reason why this is configurable is that it takes a lot of CPU power; enabling HQ doubles the CPU load effect.
Strictness (CPU) Controls how strictly the clipper clips.
Lower values leave more small spikes in the output signal, which (if you don't want spikes) need to be removed by HARD LIMIT. And HARD LIMIT removes the spikes by lowering the output level. Strictness is configurable because higher Strictness levels cost much more CPU processing power.
oversampling panel
Forces the clipper to use in 4 times oversampled mode. This removes any spikes over 0 dB that are created in the sound card during playback. These spikes can cause distortion based on the sound card design, but they don't have to.
This means that the clipping is stronger, hence may cause more artifacts for high frequencies.
For FM processing, this is automatically enabled regardless of the setting.
Lossy Compression panel
If you compress the tightly clipped output of Stereo Tool with a lossy codec such as MP3, AAC, Ogg, you will notice that you get spikes again. This is caused by the fact that almost any change in the tightly clipped signal will cause it to be less tightly clipped. To avoid getting distortion, you need to lower the output level.
But because differences in the signal occur much more in higher frequency ranges, it helps to boost the highs a bit before clipping, and lowering them again afterwards.
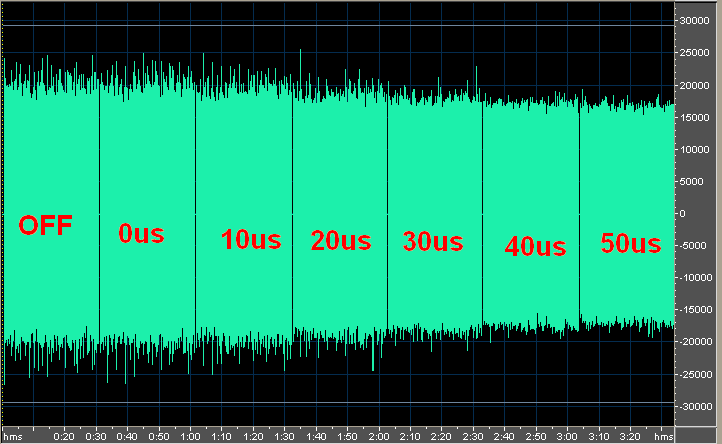
This graph shows the effect of different settings on a 128 kbit/s MP3 file.
Lossy Compression affects Loudness and HARD LIMIT.
pre-emphasis Pre-emphasis.
The amount of pre-emphasis to use before, and de-emphasis after, clipping.
hard limit panel
Final step of the processing chain. If there are any peaks left above 0 dB, this removes them by quickly lowering the volume around the peak.
Except for the Singleband compressor, none of the filters in Stereo Tool guarrantees that all the peaks above 0 dB are completely removed, hence if the Post Amp slider is set close to 1.00x (0 dB), HARD LIMIT should always be enabled.